Hole by Hole
Explore each of the 18 distinct holes at Indian River Colony Club—from the tee to the green—and discover how shot-making, natural beauty and strategic placement converge across our private championship layout. Designed to blend seamlessly with our Florida surroundings, every hole tells its own story of water hazards, elevation shifts, tree-lined fairways and thoughtful challenges, inviting golfers of all skill levels to savour the course at their own pace.
Front Nine
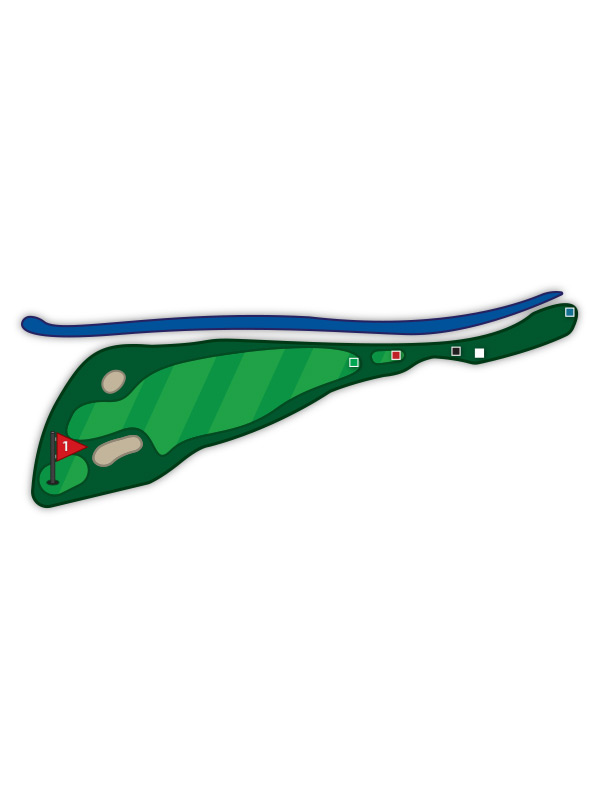
Hole #1
Par 4
| TEE | YARDS | HANDICAP |
|---|---|---|
| Blue (Mens) | 287 | 17 |
| Blue/White (Mens) | 287 | 17 |
| White (Mens) | 261 | 17 |
| White (Womens) | 261 | 15 |
| White/Black (Mens) | 261 | 15 |
| Black (Mens) | 251 | 13 |
| Black (Womens) | 251 | 13 |
| Red (Mens) | 195 | 17 |
| Red (Womens) | 195 | 17 |
| Red/Green (Womens) | 195 | 15 |
| Green (Mens) | 188 | 13 |
| Green (Womens) | 188 | 13 |
Although short and straight, the first hole requires a tee shot to the fairway between OB on the left and a water hazard on the right. A good drive allows a short iron into a very small undulating green.
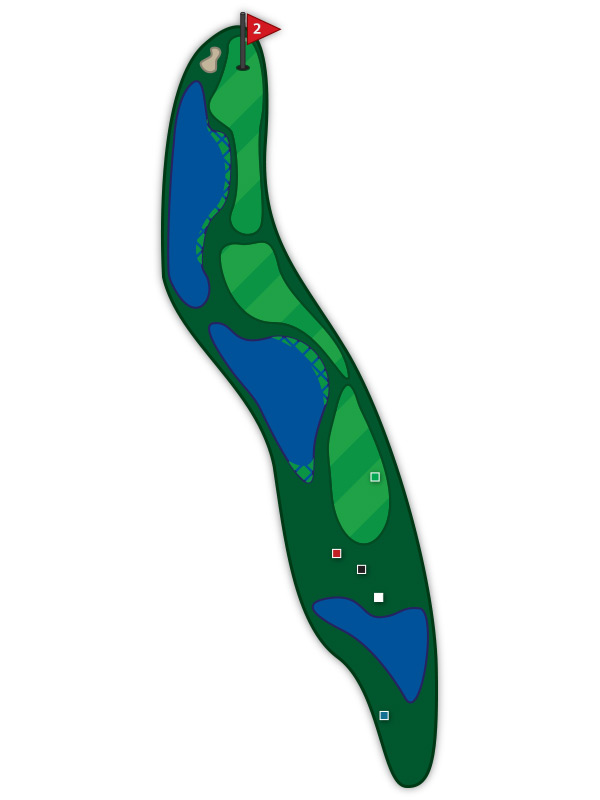
Hole #2
Par 5
| TEE | YARDS | HANDICAP |
|---|---|---|
| Blue (Mens) | 546 | 3 |
| Blue/White (Mens) | 448 | 9 |
| White (Mens) | 448 | 5 |
| White (Womens) | 448 | 5 |
| White/Black (Mens) | 448 | 1 |
| Black (Mens) | 415 | 5 |
| Black (Womens) | 415 | 5 |
| Red (Mens) | 406 | 5 |
| Red (Womens) | 406 | 5 |
| Red/Green (Womens) | 309 | 3 |
| Green (Mens) | 309 | 9 |
| Green (Womens) | 309 | 9 |
From the blue tees, this long par 5 requires a straight and long drive followed by a long fairway wood. A narrow fairway dictates a mid to long iron into the green. From the white, black and red tees, the driver may not be required, but the tee shot still must find a narrow fairway. Water follows the left side of the fairway the length of the hole. A par is a really good score.
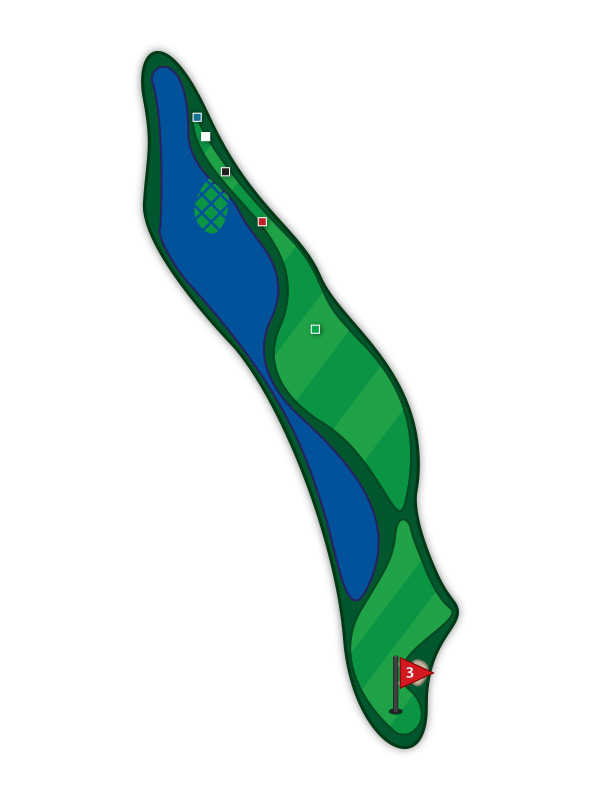
Hole #3
Par 4
| TEE | YARDS | HANDICAP |
|---|---|---|
| Blue (Mens) | 374 | 5 |
| Blue/White (Mens) | 374 | 3 |
| White (Mens) | 362 | 3 |
| White (Womens) | 362 | 1 |
| White/Black (Mens) | 320 | 3 |
| Black (Mens) | 320 | 1 |
| Black (Womens) | 320 | 1 |
| Red (Mens) | 314 | 1 |
| Red (Womens) | 314 | 1 |
| Red/Green (Womens) | 314 | 1 |
| Green (Mens) | 230 | 5 |
| Green (Womens) | 230 | 1 |
The number 1 handicap hole requires two well struck shots into a prevailing wind. The fairway narrows to about 20 yards at the 100 yard marker, making getting close to the pin a hard task. The green slopes to the rear.
Hole #4
Par 4

| TEE | YARDS | HANDICAP |
|---|---|---|
| Blue (Mens) | 365 | 1 |
| Blue/White (Mens) | 354 | 1 |
| White (Mens) | 354 | 1 |
| White (Womens) | 354 | 4 |
| White/Black (Mens) | 302 | 5 |
| Black (Mens) | 302 | 3 |
| Black (Womens) | 302 | 3 |
| Red (Mens) | 292 | 3 |
| Red (Womens) | 292 | 3 |
| Red/Green (Womens) | 213 | 9 |
| Green (Mens) | 213 | 7 |
| Green (Womens) | 213 | 7 |
This beautiful dog-leg left hole requires a long drive, a mid to long iron or fairway wood to the green is still required. A water hazard along the length of the hole on the left catches any errant shots.
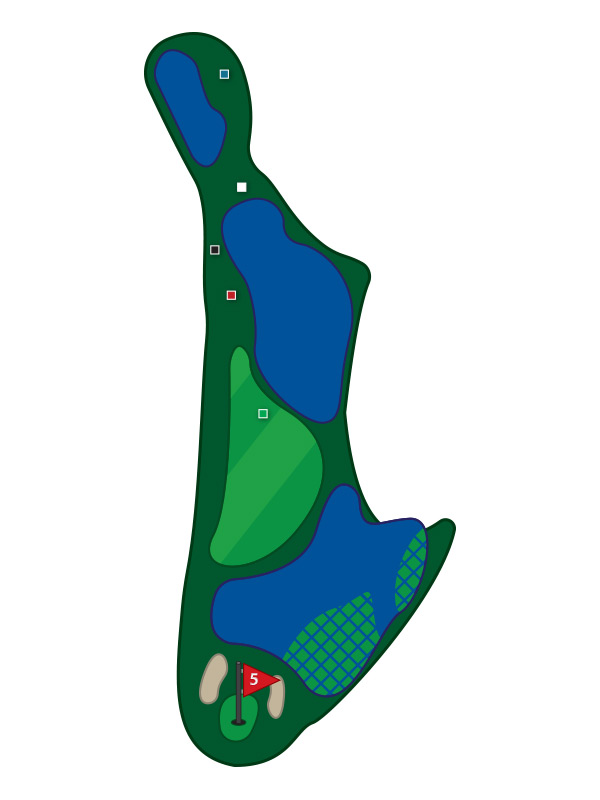
Hole #5
Par 4
| TEE | YARDS | HANDICAP |
|---|---|---|
| Blue (Mens) | 331 | 9 |
| Blue/White (Mens) | 331 | 5 |
| White (Mens) | 273 | 13 |
| White (Womens) | 273 | 11 |
| White/Black (Mens) | 273 | 7 |
| Black (Mens) | 218 | 17 |
| Black (Womens) | 218 | 11 |
| Red (Mens) | 206 | 13 |
| Red (Womens) | 206 | 15 |
| Red/Green (Womens) | 206 | 11 |
| Green (Mens) | 149 | 15 |
| Green (Womens) | 149 | 17 |
The drive is across a water hazard to a generous landing area with water on the left and OB on the right side. Once the drive is negotiated, a short iron to a narrow deep green brings a well deserved chance for a birdie or par.
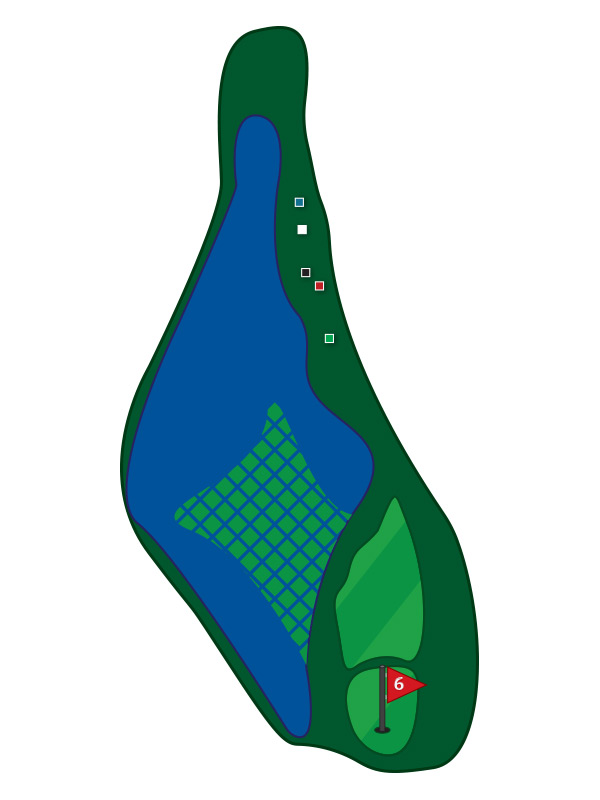
Hole #6
Par 3
| TEE | YARDS | HANDICAP |
|---|---|---|
| Blue (Mens) | 173 | 11 |
| Blue/White (Mens) | 159 | 11 |
| White (Mens) | 159 | 7 |
| White (Womens) | 159 | 13 |
| White/Black (Mens) | 117 | 13 |
| Black (Mens) | 117 | 9 |
| Black (Womens) | 117 | 15 |
| Red (Mens) | 116 | 7 |
| Red (Womens) | 116 | 9 |
| Red/Green (Womens) | 116 | 3 |
| Green (Mens) | 111 | 1 |
| Green (Womens) | 111 | 3 |
This straight-away par three, with an OB on the left and a water hazard on the right (no bail out area here). No tricks, it’s all visible from the tee…
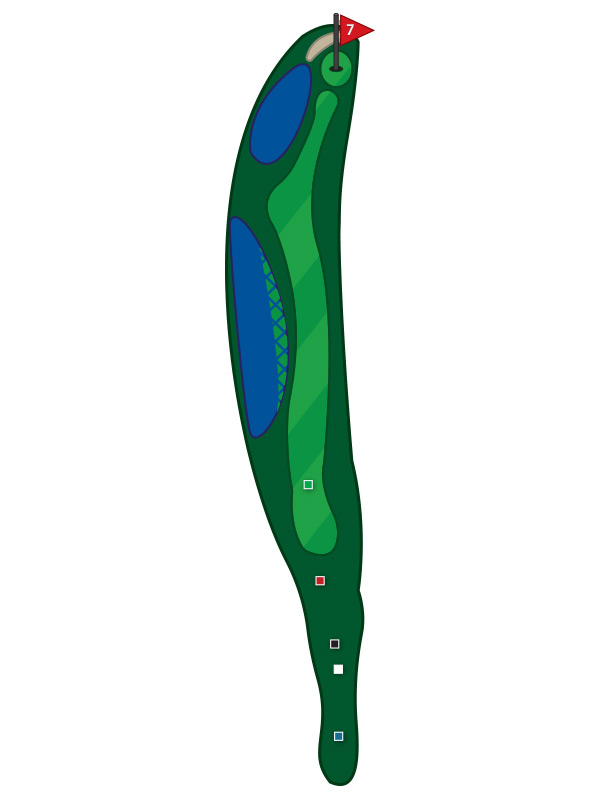
Hole #7
Par 5
| TEE | YARDS | HANDICAP |
|---|---|---|
| Blue (Mens) | 511 | 7 |
| Blue/White (Mens) | 457 | 13 |
| White (Mens) | 457 | 9 |
| White (Womens) | 457 | 7 |
| White/Black (Mens) | 386 | 17 |
| Black (Mens) | 386 | 15 |
| Black (Womens) | 386 | 9 |
| Red (Mens) | 380 | 11 |
| Red (Womens) | 380 | 7 |
| Red/Green (Womens) | 279 | 17 |
| Green (Mens) | 279 | 17 |
| Green (Womens) | 279 | 15 |
Avoid the left on this hole. After a long drive into a fairly generous fairway, the second shot is into a narrow opening and is the key to playing this hole. With water on the left and tall trees masking the right side of the fairway, a good fairway wood shot sets up a short iron to a large green for a par.
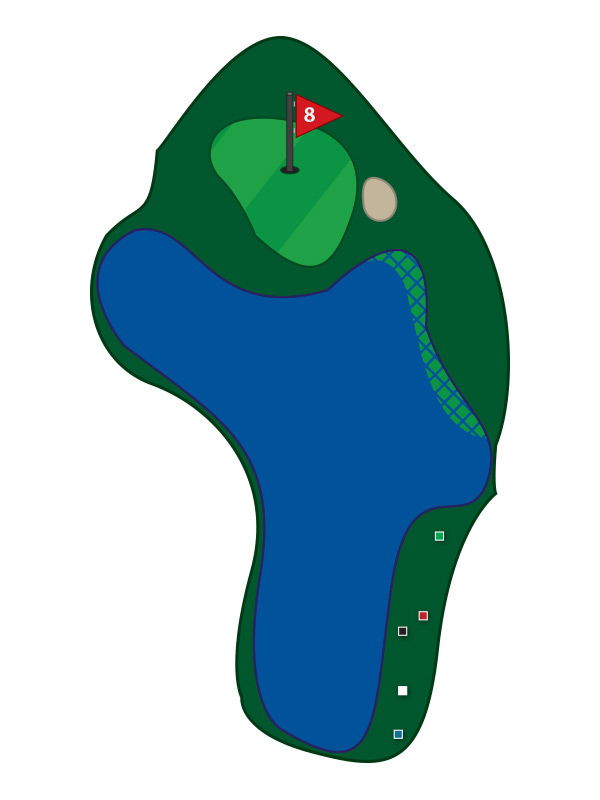
Hole #8
Par 3
| TEE | YARDS | HANDICAP |
|---|---|---|
| Blue (Mens) | 134 | 15 |
| Blue/White (Mens) | 134 | 15 |
| White (Mens) | 117 | 15 |
| White (Womens) | 117 | 17 |
| White/Black (Mens) | 117 | 9 |
| Black (Mens) | 99 | 11 |
| Black (Womens) | 99 | 17 |
| Red (Mens) | 90 | 9 |
| Red (Womens) | 90 | 13 |
| Red/Green (Womens) | 90 | 7 |
| Green (Mens) | 88 | 3 |
| Green (Womens) | 88 | 5 |
Although the tee shot is only 135 yards long, landing five yards short of the green finds a water hazard. Hit a good solid shot to make par. A big plus for this hole is watching the eagles that survey the scene from the tall pines next to the tee.
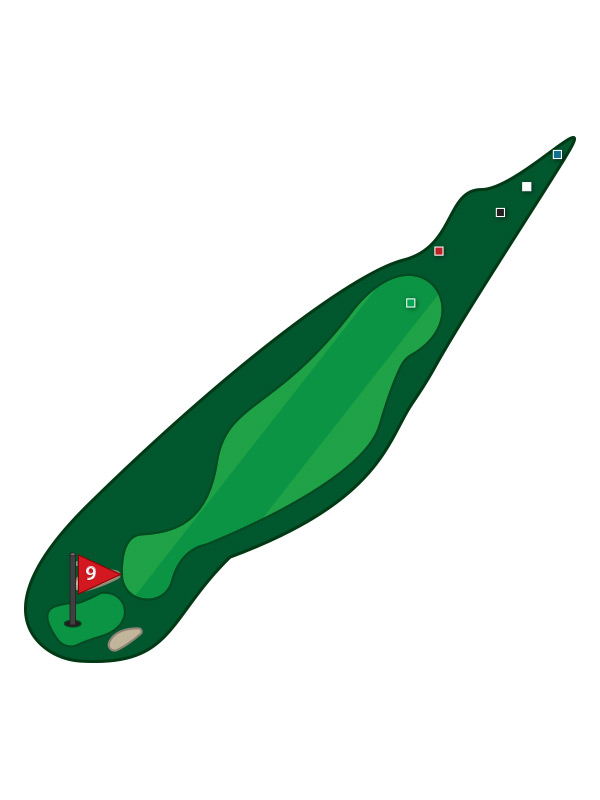
Hole #9
Par 4
| TEE | YARDS | HANDICAP |
|---|---|---|
| Blue (Mens) | 335 | 13 |
| Blue/White (Mens) | 335 | 7 |
| White (Mens) | 315 | 11 |
| White (Womens) | 315 | 9 |
| White/Black (Mens) | 273 | 11 |
| Black (Mens) | 273 | 7 |
| Black (Womens) | 273 | 7 |
| Red (Mens) | 227 | 15 |
| Red (Womens) | 227 | 11 |
| Red/Green (Womens) | 227 | 5 |
| Green (Mens) | 192 | 11 |
| Green (Womens) | 192 | 11 |
This is one of the few holes with a large driving area. Let out the shaft and have a short iron to a narrow and deep green catches an errant second shot.
Back Nine
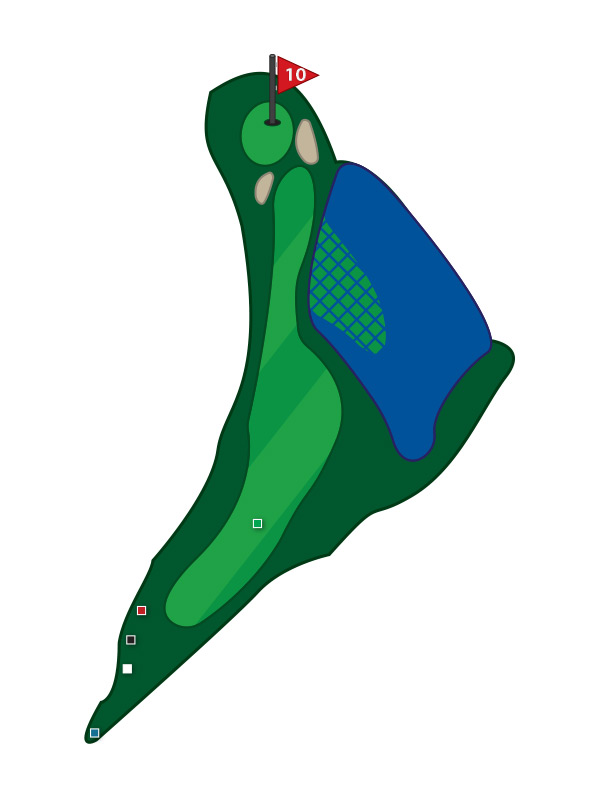
Hole #10
Par 4
| TEE | YARDS | HANDICAP |
|---|---|---|
| Blue (Mens) | 373 | 6 |
| Blue/White (Mens) | 335 | 6 |
| White (Mens) | 335 | 2 |
| White (Womens) | 335 | 4 |
| White/Black (Mens) | 288 | 2 |
| Black (Mens) | 288 | 2 |
| Black (Womens) | 288 | 4 |
| Red (Mens) | 276 | 2 |
| Red (Womens) | 276 | 4 |
| Red/Green (Womens) | 171 | 16 |
| Green (Mens) | 171 | 14 |
| Green (Womens) | 171 | 16 |
The hole is a dog-leg left. A big drive around a stand of palms to an undulating fairway allows a long iron to a green guarded by a sand trap in front. Hit two good shots for a par.
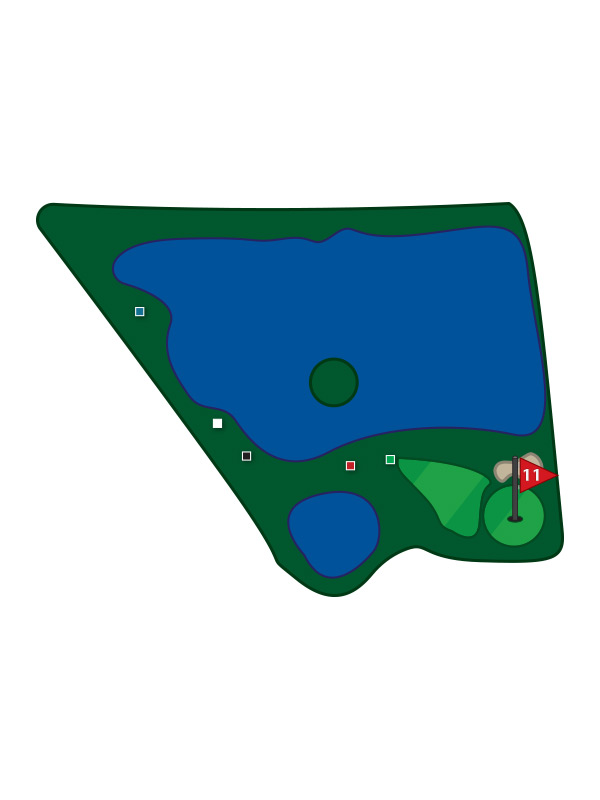
Hole #11
Par 3
| TEE | YARDS | HANDICAP |
|---|---|---|
| Blue (Mens) | 184 | 8 |
| Blue/White (Mens) | 184 | 4 |
| White (Mens) | 124 | 18 |
| White (Womens) | 124 | 18 |
| White/Black (Mens) | 124 | 14 |
| Black (Mens) | 114 | 8 |
| Black (Womens) | 114 | 18 |
| Red (Mens) | 70 | 12 |
| Red (Womens) | 70 | 18 |
| Red/Green (Womens) | 70 | 14 |
| Green (Mens) | 66 | 6 |
| Green (Womens) | 66 | 10 |
This is a mid-length par three over water with sand guarding the left side. The white, black, and red tees reduce the distance of the drive to a short iron shot. With a good solid shot, a par is possible. If you miss your drive, you can always try fishing in the well stocked fishing pond.
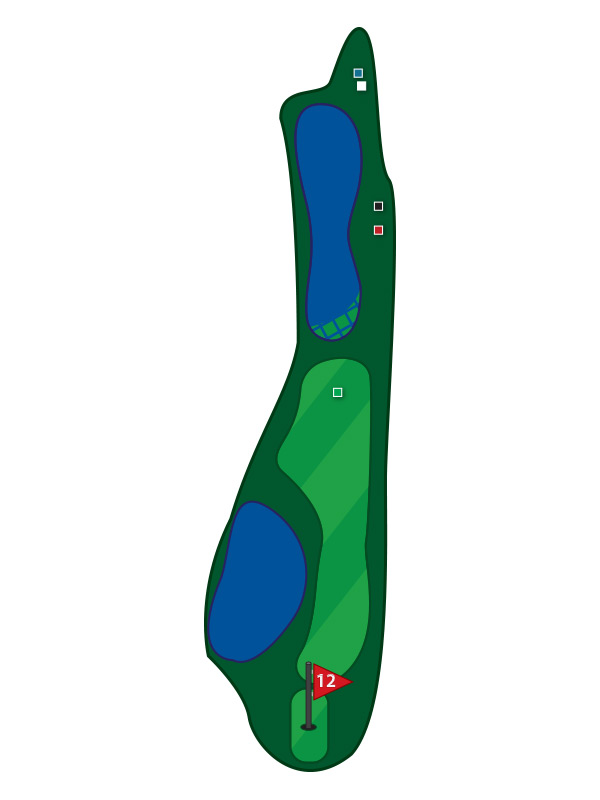
Hole #12
Par 4
| TEE | YARDS | HANDICAP |
|---|---|---|
| Blue (Mens) | 284 | 16 |
| Blue/White (Mens) | 276 | 14 |
| White (Mens) | 276 | 8 |
| White (Womens) | 276 | 6 |
| White/Black (Mens) | 276 | 4 |
| Black (Mens) | 211 | 18 |
| Black (Womens) | 211 | 16 |
| Red (Mens) | 204 | 18 |
| Red (Womens) | 204 | 16 |
| Red/Green (Womens) | 204 | 12 |
| Green (Mens) | 141 | 16 |
| Green (Womens) | 141 | 14 |
This straight hole is the epitome of the placement requirement of the IRCC Golf Course. Most people hit fairway woods or long irons from the tee due to the narrow landing area. An errant drive to 190 yards may be in the hazard. From the fairway, a short iron to a narrow and deep green leaves two good putts for par.
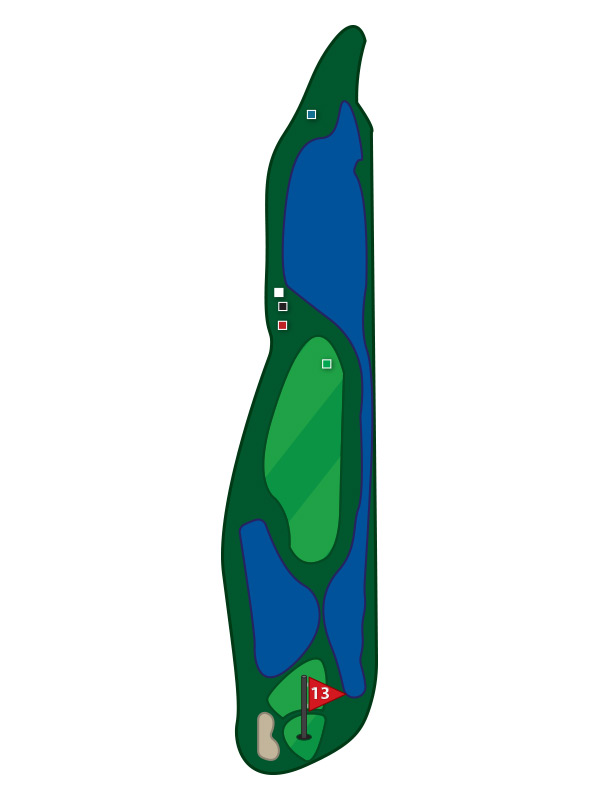
Hole #13
Par 4
| TEE | YARDS | HANDICAP |
|---|---|---|
| Blue (Mens) | 363 | 4 |
| Blue/White (Mens) | 363 | 2 |
| White (Mens) | 255 | 10 |
| White (Womens) | 255 | 14 |
| White/Black (Mens) | 255 | 6 |
| Black (Mens) | 249 | 10 |
| Black (Womens) | 249 | 6 |
| Red (Mens) | 240 | 10 |
| Red (Womens) | 240 | 6 |
| Red/Green (Womens) | 240 | 2 |
| Green (Mens) | 200 | 8 |
| Green (Womens) | 200 | 8 |
This is a relatively long par that requires a good drive and a long second shot to a large tilted green. Since the second shot is entirely over water, length off the tee does help on this hole.
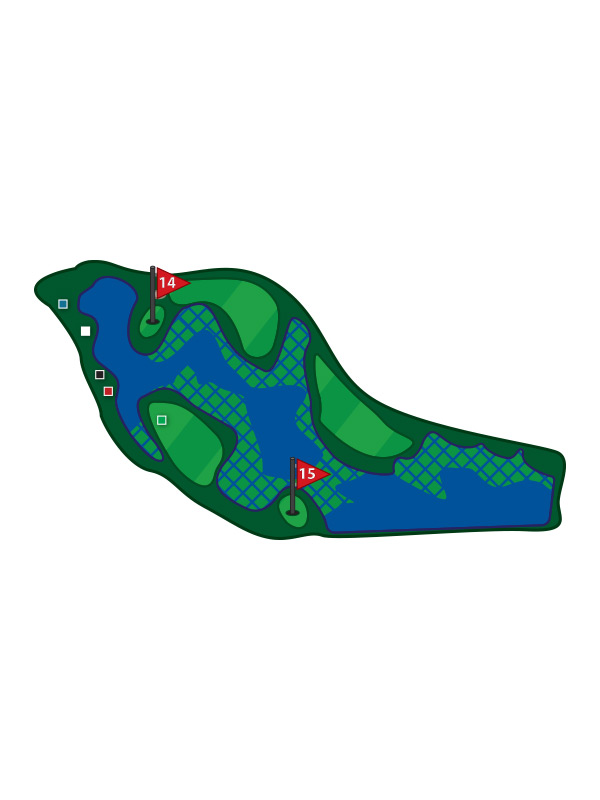
Hole #14
Par 5

| TEE | YARDS | HANDICAP |
|---|---|---|
| Blue (Mens) | 501 | 2 |
| Blue/White (Mens) | 456 | 12 |
| White (Mens) | 456 | 6 |
| White (Womens) | 456 | 2 |
| White/Black (Mens) | 398 | 8 |
| Black (Mens) | 398 | 4 |
| Black (Womens) | 398 | 2 |
| Red (Mens) | 392 | 4 |
| Red (Womens) | 392 | 2 |
| Red/Green (Womens) | 337 | 8 |
| Green (Mens) | 337 | 4 |
| Green (Womens) | 337 | 2 |
A double dog-leg with two landing areas give this hole its character. A drive over water into the fairway is followed by a fairway wood over water to a small landing area. Not surprisingly, the third shot, a short to medium iron, is also over water to a large undulating green. There is no margin for error on this terrifying and wonderful par five.
Hole #15
Par 4
| TEE | YARDS | HANDICAP |
|---|---|---|
| Blue (Mens) | 349 | 10 |
| Blue/White (Mens) | 301 | 10 |
| White (Mens) | 301 | 4 |
| White (Womens) | 301 | 8 |
| White/Black (Mens) | 244 | 18 |
| Black (Mens) | 244 | 14 |
| Black (Womens) | 244 | 10 |
| Red (Mens) | 238 | 8 |
| Red (Womens) | 238 | 8 |
| Red/Green (Womens) | 238 | 4 |
| Green (Mens) | 173 | 12 |
| Green (Womens) | 173 | 12 |
A drive to a large and wide landing area sets up a second shot with a mid to long iron (or fairway wood) to a green surrounded on three sides by water. A minor error on either shot means a ball in the hazard.
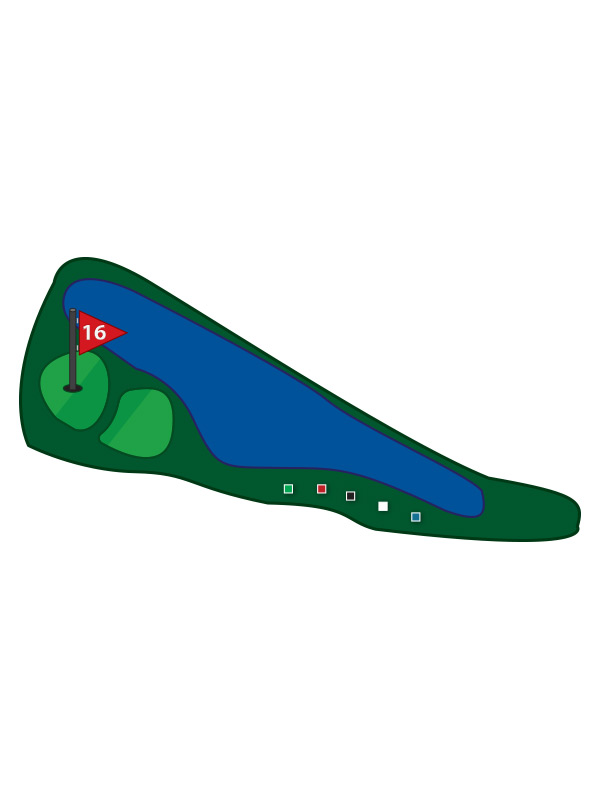
Hole #16
Par 3
| TEE | YARDS | HANDICAP |
|---|---|---|
| Blue (Mens) | 138 | 18 |
| Blue/White (Mens) | 138 | 16 |
| White (Mens) | 132 | 12 |
| White (Womens) | 132 | 16 |
| White/Black (Mens) | 132 | 10 |
| Black (Mens) | 122 | 6 |
| Black (Womens) | 122 | 12 |
| Red (Mens) | 108 | 6 |
| Red (Womens) | 108 | 14 |
| Red/Green (Womens) | 108 | 10 |
| Green (Mens) | 105 | 2 |
| Green (Womens) | 105 | 4 |
This short and straight par three allows some respite from a pressurized round. A large green catches most of the drives. This is the number 18 handicap hole. Take advantage of it.
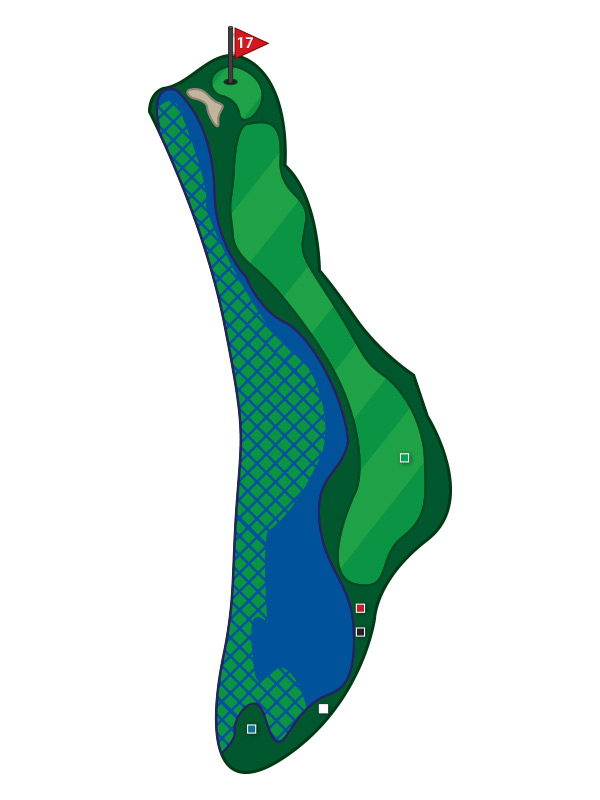
Hole #17
Par 5
| TEE | YARDS | HANDICAP |
|---|---|---|
| Blue (Mens) | 467 | 14 |
| Blue/White (Mens) | 467 | 8 |
| White (Mens) | 436 | 16 |
| White (Womens) | 436 | 10 |
| White/Black (Mens) | 436 | 12 |
| Black (Mens) | 374 | 16 |
| Black (Womens) | 374 | 14 |
| Red (Mens) | 367 | 16 |
| Red (Womens) | 367 | 12 |
| Red/Green (Womens) | 276 | 18 |
| Green (Mens) | 276 | 18 |
| Green (Womens) | 276 | 18 |
This is a shap dog-leg left, medium length par five. The drive is over water and there is water down the entire left side of the fairway. A second shot to a narrow landing area results in a short approach shot to a curved three-tiered green.
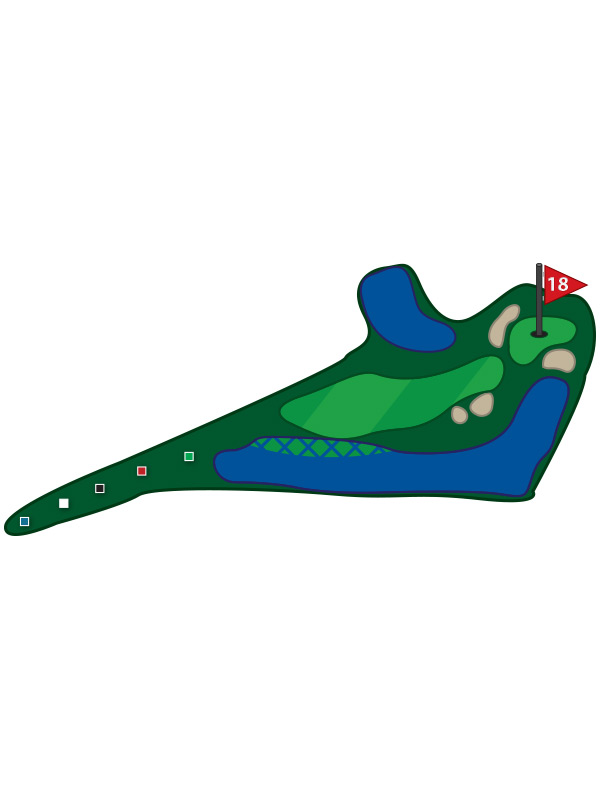
Hole #18
Par 4
| TEE | YARDS | HANDICAP |
|---|---|---|
| Blue (Mens) | 316 | 12 |
| Blue/White (Mens) | 283 | 18 |
| White (Mens) | 283 | 14 |
| White (Womens) | 283 | 12 |
| White/Black (Mens) | 255 | 16 |
| Black (Mens) | 255 | 12 |
| Black (Womens) | 255 | 8 |
| Red (Mens) | 236 | 14 |
| Red (Womens) | 236 | 10 |
| Red/Green (Womens) | 236 | 6 |
| Green (Mens) | 216 | 10 |
| Green (Womens) | 216 | 6 |
This is a fairly short par four that requires a very precise drive to land on the short grass with water on the right and OB on the left. Once the drive is negotiated, a short iron must be hit to a deep green with sand in front and water on the right. A par here brings a smile of satisfaction and motivation to try the course again.